Screenshots
Main Window
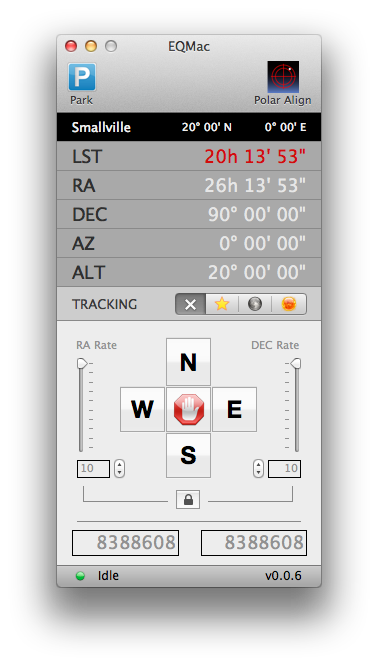
This is the main controller window for the application. It shows the current position of the mount and provides controls for manually slewing and adjusting the slew rate. You can also set the tracking mode. The small LED in the bottom left corner indicates the connection status of your mount and varies between Red (no serial port detected), Yellow (serial port detected, but mount not initialised), and Green (mount online). The numbers in the boxes right at the bottom of the window represent the position of the RA and DEC axes of the mount and are mainly for debugging at this time.
Sky Chart
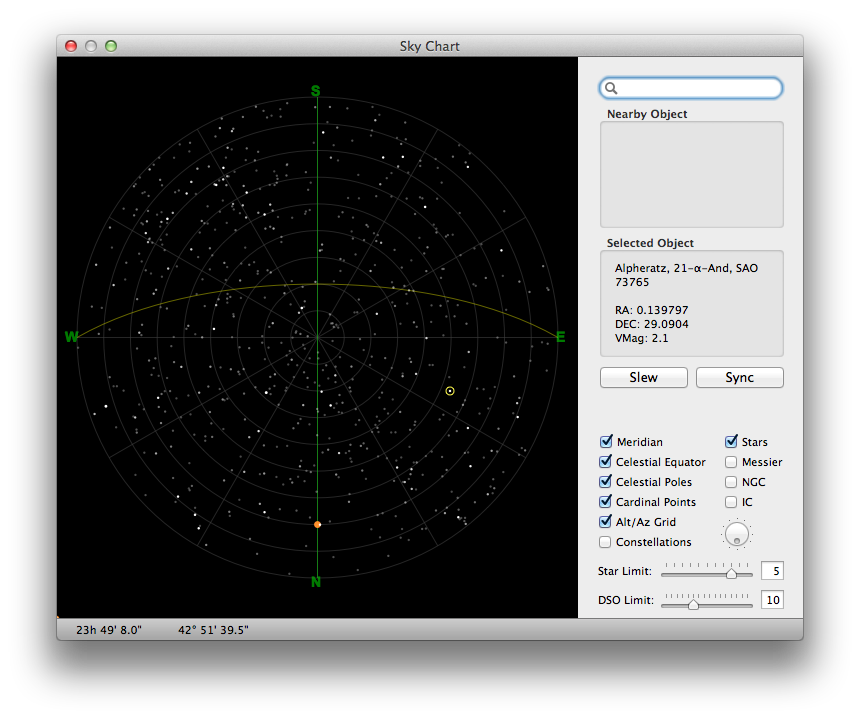 This is the Sky Chart window. It is a 2D representation of the sky as you would see it from your location. It can be rotated to suit your current orientation and plots stars from the SAO catalog up to magnitude 7. It also includes the NGC, IC, and Messier catalogues. The faint grid lines are altitude-azimuth lines plotted every 10 degrees. The yellow line drawn across the map represents the celestial equator and the orange dot is the North Celestial Pole. The green vertical line represents the local meridian.
You can control which aspects of the chart are displayed (or not) using the checkboxes and sliders in the bottom right corner of the window. This will let you tailor the map to what you want to focus on at any given time. Unfortunately, the NGC and IC catalogues are relatively large and tend to overwhelm the display if you increase the DSO magnitude limit too much.
If you turn on Constellation lines, the chart will show the 88 different constellations, although it will only draw lines between stars that are visible according to the Star magnitude limit. Thus, if this is set too low, you may find that some constellations are only partially drawn, or perhaps not at all.
Moving the mouse over different objects will show some details about them in the Nearby Object area. Select a object by clicking on it and a yellow circle will appear. You may then click the Slew button to point the scope at the selected object. Once the slew is complete, you can centre the object in the eyepiece and then click the Sync button, which will record a "1-star" alignment. Future slews nearby your this alignment object should then be accurate. It is advisable only to Sync to stars and not extended objects such as DSOs.
Finally, the top right of the window provides a search field that can be used to find objects by name or catalogue number. Presently it is a little picky about how you enter your search terms. In general, to search for an object by catalogue ID, enter the catalogue name in UPPERCASE, followed by a space, and then the catalogue number. For example, "M 13" will find a match, but "m13" will not. The available catalogues are NGC, IC, M, and SAO.
If your search finds a match, and the matched object is displayed (it might be hidden due to the controls in the bottom right), then the object will automatically be selected and a yellow circle will be shown. You may then click the Slew button to point the telescope at it.
Preferences
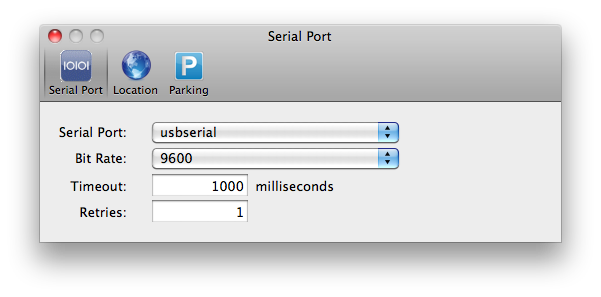 On the right is the Preferences window, which allows you to configure various aspects of the software. When you first start the application, you will need to configure the serial port to which your mount is connected. You should also define at least one Site so that the software will be able to properly calculate the sky layout. You can define several Sites in the Location tab. Finally, the Parking tab allows you to configure what the mount should do when you park or unpark it. This is not yet fully complete and does not provide a convenient way to manage custom park/unpark positions. It is recommended that you do not change the default settings in this release.
Polar Alignment
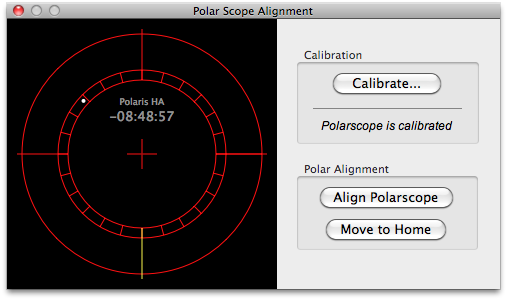 Finally, we have the Polar Alignment window, which is intended to provide help in performing an accurate polar alignment using your mount’s polarscope. To use this feature, the software needs to calibrate the orientation of your polarscope. Instructions on how to do this will be posted on the Documentation page. Once calibrated, assuming you haven’t moved moved your mount since you did the calibration, you should be able to simply click Align and the mount will rotate in RA to position the Polaris circle in the correct position for alignment. You can then use the alt/azimuth adjustment bolts to polar align your mount. Once you are done, click the Home button to return the mount to the home position for mounting your scope.
Mount Limits
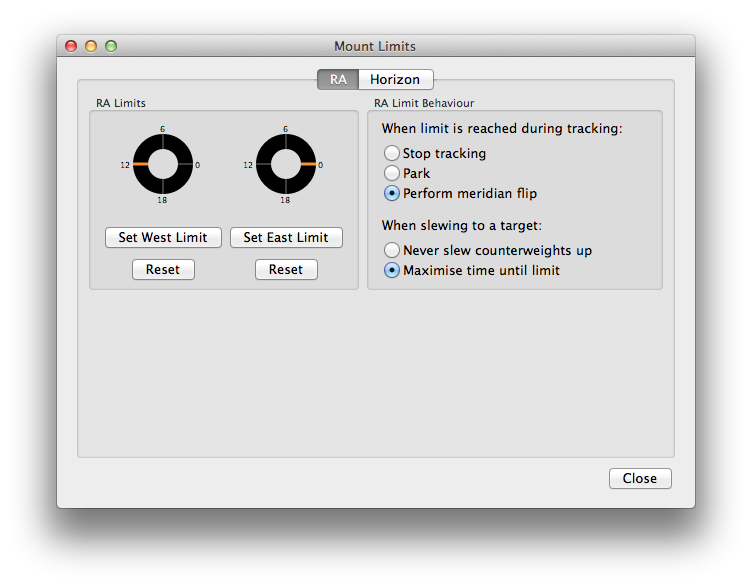
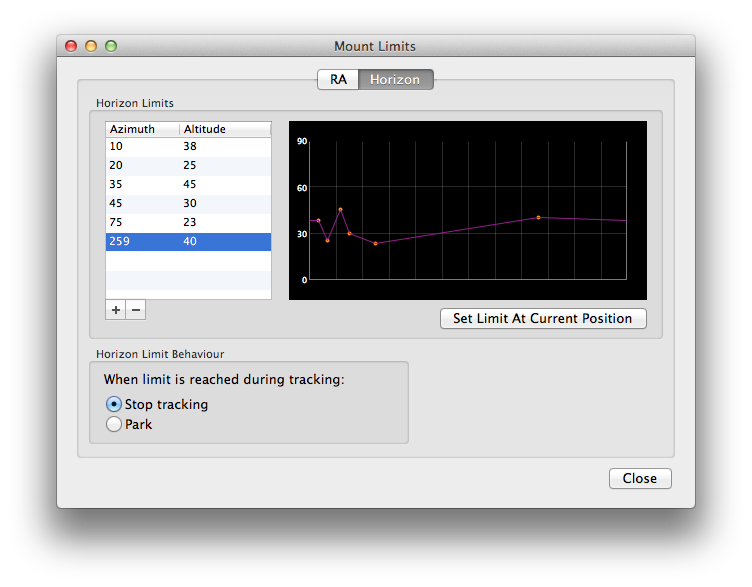
Here are a couple of screenshots showing the configuration areas for the Mount Limits feature.
You can set both RA and Horizon-based limits. Both limits will determine when the mount should stop tracking and will determine whether a slew is possible.
As you can see, it is possible to set the desired behaviour when one of the limits is reached during tracking. This will hopefully mean that you can leave the mount unattended during the night and not worry about it crashing into the tripod / pier.
Finally, for the imagers, it is possible to set an option that produces more intelligent slewing so as to maximise tracking time without needing a meridian flip. This is most useful, for example, when imaging an object that has yet to transit the meridian. The mount will be able to slew counterweights up (provided this is within configured limits) so that a meridian flip will not be required on transit. Instead the mount will track continuously, probably until the object sets.
- Log in to post comments