Documentation
In theory, EQMac should support any of the Skywatcher EQ-series mounts, although I have only been able to test it on an EQ3-2 Synscan and an NEQ6 Pro since these are the mounts I currently own. Please see the Screenshots page for basic overview of the software. Below you will find some important information for configuring and using the software. Please read this carefully and follow what it says.
Before You Start (Requirements)
As with any application, there are some requirements that you will need to meet before you can make use of EQMac. These are as follows:
- 64-bit Intel-based Mac
- OS X 10.6 (Snow Leopard) or better. Has been tested with Lion and Mountain Lion.
You will also require some method to connect your Mac to the mount. There are essentially two options here:
- Connection using an EQDirect-type device
- Connection using a generic USB Serial port via the Synscan hand control
Which ever of these options you choose (described on the next page), you will need to make sure that you've installed the OS X device driver for the EQDirect or USB Serial port that you are using. Please check with the manufacturer or supplier of your device to be sure of the correct driver to use.
- Log in to post comments
Connecting Your Mac to the Mount - IMPORTANT!!!
Before we go any further, we need to make sure you understand how to connect your Mac to your mount. This is important to do correctly as I have heard horror stories of people blowing up their mounts or computers by doing this wrongly on Windows with EQMOD. I’d hate that to happen to you here, so please read the following carefully and if you have any questions, please ask me.
Firstly, to use this software at all, you need a Synscan or Syntrek EQ mount. Simple rule is, if you don’t already have some kind of electronic hand controller for your mount, then this software will not be able to communicate with it (although EQMac does not need the hand controller to communicate with the mount).
Assuming you have a suitable mount, how do you connect it? Well, there are two ways, which I’ll refer to as EQDirect Mode and PC-Direct Mode. Each of these is described below.
IMPORTANT: Although it may look like your mount has a standard RS-232 serial connector on it, this CANNOT be directly connected to your Mac. It operates at different voltage levels and you will damage either the mount or your computer if you try to connect them directly. DO NOT TRY THIS!
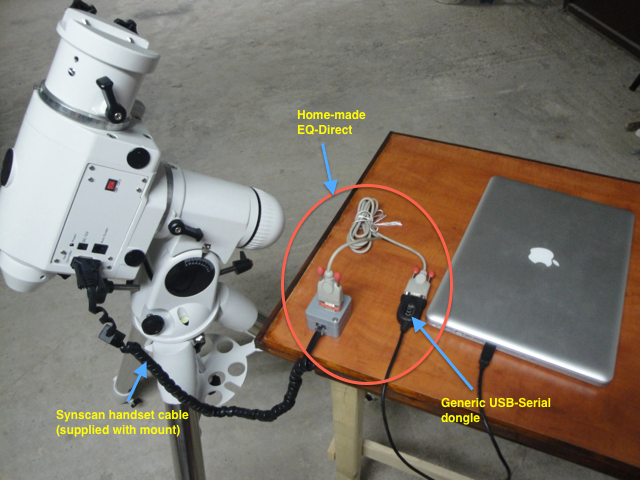
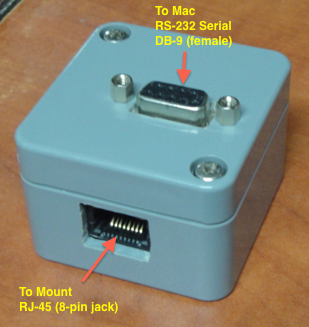
With EQDirect Mode, you purchase an EQDirect-type product such as this one, HiTecAstro EQDIR Adapter, and plug it into a USB port on your Mac. You will need to install the appropriate device driver before your Mac will recognise the device. The other end of the EQDirect plugs into the mount in place of the handset. I don't actually own a commercial EQDirect product as I prefer DIY. The image to the left is my home-made EQDirect box. When combined with a generic USB-Serial device and a serial extension cable (sometimes called a null-modem), the result is the equivalent of a commercial EQDirect device. My wiring setup is shown on the right.
With PC-Direct Mode, you connect your Synscan handset to the mount as usual and power up the mount. Go through the handset setup until you reach the star-alignment phase, at which point you will say NO. You do not need to enter valid setup information at all here, we just need to get past the setup to the handset menu. Once you are in the menu, go to UTILITY FUNC and choose PC DIRECT MODE. Now look at the connectors at the bottom of your handset - there are three. These are shown in the image below.
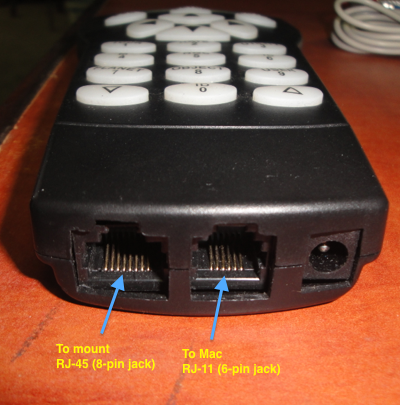
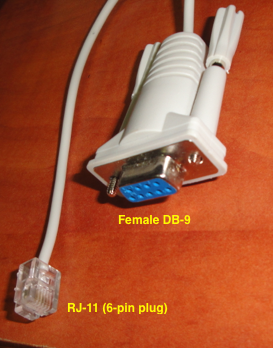 Your mount should be connected to the port on the left of the handset in the usual way using the supplied cable. There is another RJ-11 connector in the middle. You will need to connect a special serial cable to this middle connector. Your mount should have been supplied with the appropriate cable (it has a DB-9 female on one end and an RJ-11 male plug on the other and is shown on the right).

First Time Configuration
The first time that you run the application, it will not have any idea where you are located and will not know which serial port to use for communicating with your mount. Whilst in this mode, the main window will have most of the controls disabled and the LST (local sidereal time) display will not be accurate (unless you happen to be at latitude 0, longitude 0).
The first thing to do is open the Preferences window (Mount -> Preferences...). Then select the Location tab so we can tell the software where you are located.
- Click the + button below the empty list on the left. A new site will be added to the list and its name will be in edit mode.
- Type in an appropriate name for your site and press ENTER.
- Once your site is named, head over to the right hand side and edit the latitude and longitude for your site.
- If you like, add any other sites that you may wish to use.
- Choose your current/default site in the pulldown menu in the bottom right of the Preferences window.
Next, plug in the serial port that you intend to use with your mount and follow this procedure:
- Close the Preferences window, and then open it again (sorry, this is a small bug). This will cause the software to refresh the list of serial ports it knows about, otherwise the one you just plugged in would not be shown in the list.
- Select the Serial Port tab.
- The current serial port should show as “No Value”. Use the drop down menu to select the port that you just plugged in.
- Leave all the other settings as they are.
- Close the Preferences window.
That’s it! You should now be fully configured for use. You should notice that the LST display is now accurate for your location and the Sky Chart should now correctly represent the sky as it appears in your chosen location (although it may take up to 30 seconds to update once you change site).
Try It Out!
Now that you’re fully configured and correctly connected to your mount, if you still have your serial port (or EQDIR) plugged in, unplug it, wait a couple of seconds and then reconnect it. You should see the red LED in the bottom left of the Main window turn yellow and the text box above it should say “Detecting mount...”.
If you now connect your serial port to the mount and power up the mount controller, after a few seconds the software should detect the mount and the yellow LED should turn green and report a status of “Idle”.
Generally speaking, you should be able to plug in your serial port, connect it to the mount, and power up the mount in any order. The software will auto-detect the mount in due course and the software will always reflect the current status with the coloured LED - let’s call it the connection LED. Depending on how you connected your mount, you may have gone straight to green since the detection phase is quite quick.
Once the software has detected your mount, you should notice that the RA/DEC and ALT/AZ fields are now filled with data on the current position of your mount. In fact, the software doesn’t have a clue what position the mount is in at the moment and will assume that it is in the HOME position (counter-weight bar down, scope pointing at the celestial pole). If your scope isn’t in the HOME position, then you should loosen the RA/DEC clutches and move it to the HOME position.
Polar Alignment Tool
EQMac includes a polar alignment utility designed to help you achieve a more precise alignment. It will not be as precise as performing a Drift Alignment, but it will be good enough for observing and perhaps good enough for imaging depending on how you feel about polar alignment accuracy.
To use the polar alignment tool, it must first be calibrated. The goal of calibration is to let EQMac understand the positioning of your polarscope reticle, particularly the position of the small circle into which you will ultimately place Polaris. EQMac needs to know how far to rotate the RA axis to place the small circle at a known reference position. Once it has this information, it can compute the exact location of Polaris and rotate the RA axis so that the small circle is in exactly the right place.
To get started, let's assume that you have your mount in the home position and that you do not have a scope or counterweights attached. This is important because during polar alignment, the RA axis could be rotated up to 180 degrees away from home, and if you had a scope attached when that happened....well, <clang>, <tinkle>, <tears>.
Your first step is to determine the nearest reference point to the Polaris circle for your mount. EQMac will allow you to set the reference point to 12 o'clock, 3 o'clock, 6 o'clock, or 9 o'clock. So, with the mount in the home position, and the DEC axis possibly rotated 90 degrees to enable views through the polarscope, have a look at the position of the small Polaris circle and determine to which reference position on an imaginary clock face the circle is nearest. For example, if you see the circle is roughly at the 2 o'clock position, then you might choose 3 o'clock as the reference point because that would require the least rotation of the RA axis from home to place the Polaris circle at the reference point. Alternatively, if the circle is sitting at say 7 o'clock, then you might choose 6 o'clock as the appropriate reference. Every mount is different because the polarscope reticle will be randomly positioned during the assembly process.
For the benefit of explanation, I will assume that you have chosen 6 o'clock as your reference point. The next step is to use the latitude and longitude adjustment bolts to position Polaris at the centre of the crosshairs in the middle of the large circle around which the smaller circle rotates. When Polaris is positioned in this way, use the appropriate adjustment bolt to move Polaris into the reference position that you have just chosen on the circumference of the larger circle. So in our example, we would use only the latitude bolts to move Polaris down to the 6 o'clock position sitting exactly on the outline of the larger circle. Once you have done this, use Polaris as your guide to slew the mount in RA until the small Polaris circle is also in the reference position exactly covering Polaris.
When you are happy that both Polaris and the small Polaris circle are in your chosen reference position, click the Calibrate... button in the Polar Alignment window. EQMac will record the current position of the mount (including the DEC axis) for use in future alignment sessions. The calibration is now complete and will not need to be performed again provided that you do not release the clutches and alter the position of the mount manually. If you cannot avoid this due to having a portable setup, then you will need to perform the calibration steps each time.
Once calibration is complete, all you need to do is click the Align Polarscope button and EQMac will rotate the mount in RA until the small Polaris circle is in exactly the right position for polar alignment. Once the alignment slew completes, the mount will begin tracking so that the small circle stays in the correct position while you perform the actual polar alignment. Not that Polaris would move much during that time, but every little helps as they say.
When EQMac has aligned the small Polaris circle, use the latitude and longitude adjustment bolts to place Polaris inside the small circle. Once you are happy with the positioning, click the Move to Home button and your polar alignment is complete. You can load up the scope and counterweights and begin your session.
- Log in to post comments
Using the Stellarium Interface
The EQMac software will listen on ports 10001, 10002, and 10003 for Slew, Sync, and Abort operations initiated from Stellarium. Unfortunately, at least for me, the Stellarium plugin configuration interface doesn’t work very well making it difficult to define telescopes to be controlled. For this reason, I have added a new section to the EQMac Preferences window to let you define your telescope and configure Stellarium automatically.
To configure Stellarium, make sure you DO NOT have Stellarium running. Open the EQMac Preferences window and select the Stellarium section. Type in a name for your telescope and leave the other settings alone. Click the Configure Stellarium button and you are done. Be aware though, that this will overwrite any previous telescope configuration you may have made within Stellarium.
Next start up Stellarium and open the Configuration window. Select the Plugins tab and choose Telescope Control from the list on the left. Make sure that the check box for “Load on Startup” is enabled. You can then close the configuration window.
If you have your mount connected to EQMac, you should notice that Stellarium shows the current position. If you select an object and press CMD+1, your scope should begin slewing to that object. You should see the scope location change in Stellarium as the slew sweeps across the sky. Once the slew is complete, you can align the object in your scope and press CMD+2 in Stellarium to perform a Sync on the chosen object.
It is best to either perform ALL your Sync operations from Stellarium, or ALL from the Sky Chart in EQMac. This is because there may be slight differences in the coordinates used in the two applications. If you have a mixture of Sync data from both applications, slews may not be accurate. Please also note that Sync data is not saved between launches of the EQMac application unless you park the mount before closing EQMac.
Pulse Guiding with PHD
Versions 0.0.5 and above of EQMac provide pulse guiding integration with PHD.
To set this up, you should first run EQMac as normal. Go into Preferences and select Pulse Guiding. This will reveal two configuration options to set the guide rate for the RA and DEC axes. The settings represent a percentage of the current tracking speed. So for example, if you are tracking at the sidereal rate with a 30% guide rate, the guide pulses will cause the mount to track at sidereal +/- 30% in RA, and at 30% of sidereal in DEC.
It is possible to set the guide rate to 0%, which has the effect of ignoring guide pulses for that axis. However, if PHD is sending pulses during a calibration run and EQMac is ignoring them for a particular axis, calibration will eventually fail since the guide star will not move. Therefore, it is probably best just to switch off guiding for that axis in PHD.
It is also possible to set the RA guide rate to 100%, which will cause tracking to stop completely for eastward guide pulses. For westward pulses the mount will run at twice the current tracking speed for the duration of the pulse. Of course, this will all be reversed if you happen to be in the southern hemisphere.
It is recommended to set a guide rate of around 30-50% so that guide pulses make very fine-grained corrections.
Once you have set the guide rates as desired, you should start up PHD and set the mount integration type to EQMac using the Mount menu. Click the connect button to get PHD connected to EQMac. Configure and connect to your guide camera and then acquire your guide star as you usually would. Please note that at the time of writing, you will need to download a special pre-release version of PHD. This version contains the support for EQMac, which has not been yet been officially released. The pre-release version of PHD is available from Craig Stark's website. You will need version 1.13.3 or above.
You may need to adjust the calibration step size in the PHD brain icon configuration dialog. During my testing, I found that a calibration step size of 2500ms worked well with an EQMac guide rate of 30%. However, your mileage may vary depending on your exact setup, so you may need to experiment here to get the best results.
When everything is configured, make sure EQMac is tracking at a rate appropriate for your guide target (typically sidereal for stars) and tell PHD to start guiding and it should begin its usual calibration run. If you look at the status bar in the main control window of EQMac, you'll be able to see the various guide pulses arriving and of course the guide star should be moving in the PHD window. When calibration is complete, guiding should commence as normal.
Finally, I should point out that EQMac will only be responsive to guide pulses if the mount is tracking. If not, then guide pulses will be ignored since it doesn't really make sense to be guiding but not tracking. However, if you've slewed to your target as normal, EQMac should start tracking automatically once the slew completes and everything should be fine.
Mount Limits
The new Mount Limits feature is designed to let you control the behaviour of the mount when it is tracking and a configured limit is reached. The other somewhat related feature that it enables is Counter-Weights-Up slewing. To use the Mount Limits feature, make sure the software is connected to the mount (green LED in the bottom left of the main window), and then click the Limits button in the toolbar. This will open the Mount Limits monitoring window.
The Limits Monitor window shows several things:
- Whether or not limits are enabled, and if enabled and a limit is reached, it will tell you which limit was reached.
- The remaining time until the RA and Horizon limits will be reached.
- The current position of the mount with respect to the configured limits. The RA display show the position of the RA axis (orange line) in relation to your configured limits (red lines). The Horizon display plots your configured horizon centered either on North or South, depending on which way the telescope is actually pointing. An orange curve is also plotted representing the current Declination. If the declination remains fixed, the object your telescope is tracking will follow the orange curve across the sky. The yellow dot plotted on the curve shows the current position of the object being tracked.
- A switch to turn limits on or off. If limits are off, none of the configured behaviours will be triggered.
- A button to configure the limits, which opens a new configuration window.
You can turn limits on and then close the monitoring window if you do not wish to have it on screen the whole time.
- Log in to post comments
Configuring Mount Limits
Clicking the Configure... button in the Limits Monitor window will open the Mount Limits configuration window. This window has two tabs allowing you to separately configure the RA and Horizon limits and respective behaviours.
RA Limit Configuration
The RA Limit configuration tab is split into two aspects. The left-most area allows you to configure the left and right limits for the RA axis of the mount. The first time you open this window, both the left and right limits should be set exactly horizontal. If you want to change either of these limits, you should slew your mount to the position at which you want to set a limit and then click the Set Limit button (either left or right). The display will update to show your newly configured limit by moving the red line.
The terms "left" and "right" were used for the limits because they seemed more general than say "east" or "west", which would be different depending on which hemisphere you are in. In case it is not clear, the "left" limit is when the RA axis is slewed such that the scope would be on the left side of the mount looking at the mount from behind. For northern hemisphere users, the left limit is the western limit and is the one that controls when tracking will stop. If you are in the southern hemisphere, the left limit is your eastern limit and will control whether or not a counterweights-up slew is possible. The "right" limit is the opposite of the "left" limit according to the previous explanation.
Your western limit is used to detect when tracking should stop and the Limits Monitor window reports how long you have until this limit is reached.
Your eastern limit is used to detect whether a counterweights-up slew is possible. If you are trying to slew to an object that has not yet transitted the meridian, the normal behaviour would be to slew the RA axis to the western side which means that you'll need to do a meridian flip once the object does cross the meridian (or actually when your western RA limit is reached). However, if the object is sufficiently close to crossing the meridian such that an eastern RA slew could be achieved without violating your configured limit, then a counterweights-up slew will be performed. This will allow you to track objects across the meridian without needing to perform a flip and will be especially useful to imagers who want to track an object for longer without interruption.
The right hand side of the RA Limits configuration tab allows you to control what action should be taken when the RA limit is reached during tracking. The options are to stop, to park, or (in a future version) to perform a meridian flip and continue.
You can also configure whether counterweights-up slews are permitted or not. If you select the "Never" option, EQMac will not behave any differently than it used to. However, if you choose the Maximise Time Until Limit option, EQMac will intelligently decide whether it can gain more tracking time by slewing counterweights-up. This will only happen if your eastern limit would not be breached in doing so.
Horizon Limit Configuration
The Horizon Limits configuration tab allows you to define the position of your local horizon. The horizon view to the right plots the horizon with the horizontal axis representing azimuth starting at 0 degrees on the left and running through to 360 degrees at the right-hand edge. The vertical axis represents altitude and ranges from 0 to 90 degrees.
You can enter data for your horizon in two different ways. Either enter an Azimuth and Altitude manually in the list to the left of the horizon display, or you can slew your scope so that it points at the horizon and then click the Set Limit At Current Position button. In this way, you could slew to strategic points on your local horizon and click the button to accurately map your horizon. The software will interpolate between each point. You can change or delete any of the points in the list.
The default horizon (with no points) is a straight line at altitude 0 degrees.
Below the horizon configuration is an area to allow you to set the behaviour when the horizon is reached during tracking. You can set it to stop or to park.
- Log in to post comments
Using a Gamepad
As of v1.1.0, EQMac supports the use of a gamepad to control various features of the software. I personally use a Logitech Wireless Rumblepad 2, which attaches to the Mac with a small USB wireless receiver. However, it should be that any gamepad device which interfaces with software via the USB HID protocol will work in some way with EQMac. If you don't need to install a special device driver on the Mac, chances are the gamepad will work with EQMac.
Before you can use your gamepad with EQMac, you will need to configure it so that EQMac knows what you want each of the buttons and joysticks to do. You can find the configuration settings in EQMac -> Preferences... The settings dialog looks as shown below:
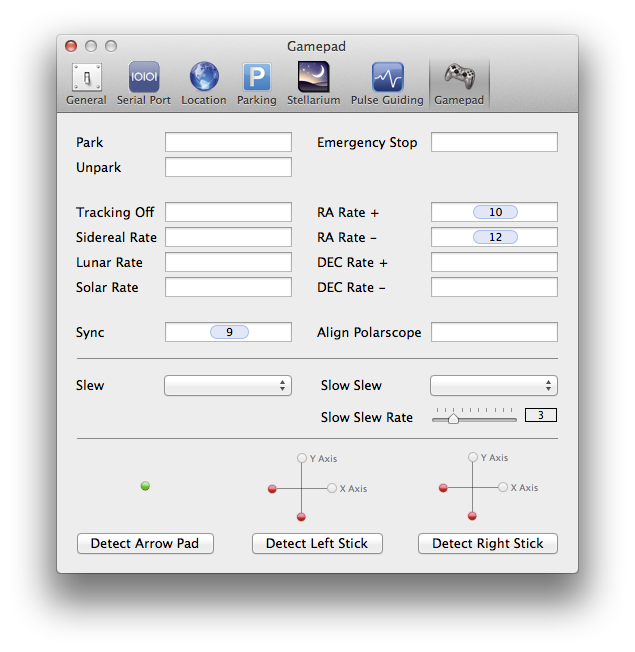
The configuration is split into 3 sections. The top section configures which button will activate each of the listed functions. For example, my own gamepad configuration is setup so that button 10 increases the manual slew rate and button 12 decreases it. Similarly, button 9 will do a sync to the last selected target. The middle section specifies which of the joysticks to using for slewing, and optionally "slow slewing" (more on this further down). Finally, the bottom section contains the tools needed to detect and configure the various joysticks and arrow pads that your gamepad may contain. The red and green "LEDs" indicate whether or not EQMac thinks you've configured these things or not. In the image above, the arrow pad has been successfully detected, but the joysticks have not.
General Configuration Notes
Before getting started with the configuration, it is worth noting that whilst you have the Preferences window open, EQMac is in a special configuration mode and any gamepad inputs will be treated as configuration actions. Therefore, once you've configured the gamepad, you will not be able to use it to control the mount while the Preferences window remains open.
Configuring Gamepad Buttons
To configure actions for the different buttons on your gamepad, first make sure it is plugged into the Mac. Using the mouse, click in the input field next to one of the actions in the top section of the configuration dialog. Then simply click the gamepad button you'd like to activate this feature. You should notice a button number "token" appear in the input field. The numbers that appear are not necessarily related to any labelling that may be physically on your gamepad. They are internal numbers by which the system can recognise the different buttons.
Once you have configured several buttons in this way, you can use them to control the various features of EQMac once you close the Preferences window. If you change your mind about a particular button, you can simply edit the input field in the configuration dialog and delete the button token.
Also worth mentioning is the fact that you cannot assign buttons that are part of an arrow pad to functions in the top section of the configuration dialog. This is because an arrow pad is considered to be a special type of joystick and does not generate button-like inputs to which EQMac can respond. You can, however, use the arrow pad to control slewing if you so desire.
Configuring an Arrow Pad
If your gamepad has an arrow thumbpad, you will need to have EQMac detect it before it can be used to control slewing. To do this, click the Detect Arrow Pad button at the bottom left of the configuration dialog. The LED above should be RED. Then simply click any of the arrows on the thumbpad and the LED should turn GREEN if EQMac has detected the arrows. If the LED does not turn green, then EQMac was not able to recognise the arrows for some reason and you should "unclick" the Detect Arrow Pad button to stop the detection.
Once your arrow pad has been detected, you can assign it to control a slewing function if you wish. More on this below.
Configuring a Joystick
Gamepads may come with one or more joysticks. EQMac can support a "left" and a "right" stick if you have them on your device. Each stick needs to be detected separately. To do this, let's consider how to detect the "left" stick. First click the Detect Left Stick button, and then click the X-axis option. While the LED for the X-axis is RED, slowly move the left joystick horizontally back and forth until the LED turns GREEN. Try not to move the stick vertically at all while you are doing this. Once the LED turns GREEN, click the Y-axis option and do the same thing, but this time slowly move the stick vertically up and down (and try not to make horizontal movements). Once both LEDs are GREEN, your joystick is fully detected. You can repeat this process for the other joystick if you have one.
Assigning Arrow Pad and Joystick Functions
The middle section of the configuration dialog allows you to select which stick or arrow pad to use for slewing the mount. For each slewing function you can select None, Left Stick, Right Stick, or the Arrow Pad.
The Slew function refers to general manual slewing of the mount and is essentially the same as clicking on the N, S, E, W buttons in the main UI window. When you use the assigned stick or arrow pad to control slewing, the mount will slew at the rate configured by the RA and DEC rate sliders in the main UI window.
The Slow Slew function is essentially the same as the normal slewing function except that you can preset a slew rate for it in the gamepad configuration dialog. The idea here is that you can have the main slewing function set up on the Left stick (for example) and have it slew around at arbitrary speeds. However, on the Right stick (say), you can set up Slow Slewing for doing fine star alignment adjustments without having to constantly switch slew speeds (which you'd have to do without this feature). Of course, you are free to set whatever slew rate you like for the "slow" slew feature, so nothing would stop you from setting a high slew rate if you wanted to have a stick that was always slewing at maximum speed, for example.
How I Configure My Gamepad
What I generally do is have things setup so that one stick slews slowly for fine alignment adjustments, and the other slews at the current rate. I then have 2 buttons set so that I can quickly increase or decrease the slew speed if I need. Finally, I have another button set to perform a Sync. This allows me to do star alignment easily by choosing a target in the Sky Chart map, slewing to it, then using the gamepad to get the star aligned and finally Sync it without having to use the computer.
- Log in to post comments
Interfacing With Other Software
As of v1.1.0, EQMac provides an LX200 emulation mode via TCP/IP, which other software can use to interface with your mount. EQMac will listen on TCP port 4030 for incoming connections. Once software has connected to your Mac on TCP port 4030, it can send LX200 commands over the connection and EQMac will convert these to native commands to control the mount. This allows at least the following popular applications to interface with EQMac:
- Sky Safari (iPhone, iPad, and Mac versions)
- Equinox Pro
- Starmap Pro (iOS application)
However, generally speaking, any application that can be configured to communicate with an LX200 device over a TCP/IP connection can be used to interface with EQMac. The above applications are the only ones I have personally tested and use.
If the application you wish to interface with is on your Mac, then it will likely ask you for an IP Address or Hostname to connect with. You should configure either localhost or the IP address 127.0.0.1. If a port number is requested, you should enter port 4030.
If you would like to connect an application running on another device, such as a mobile phone, the trick to making this work is arranging for your Mac and the other device to be on the same network. If both devices can connect to the same WiFi router, this is easy, but if no such router is available, you can tell your Mac to Create Network... in the wireless networking menu bar icon. Getting this setup is beyond the scope of this documentation, but I am sure there are many tutorials on how to do this available via Google search.
Once you do have the Mac and your device on the same network, you will need to know the IP address of your Mac. You can determine this by opening System Preferences and selecting Network. Then choose Wi-Fi from the list on the left. It will show your IP address at the top right where the status is displayed.
One thing to watch out for is the built-in Mac firewall. If you are having problems making things work, it could be that the firewall is blocking the incoming connections. Since firewalls are a whole topic unto themselves, I do not have space here to go into more detail about this, other than to warn you to check the firewall settings if things are not working correctly.
- Log in to post comments
Managing Star Alignment (Sync) Data
Version 1.3.0 of EQMac added a Star Alignment data management facility. You can access this by clicking the Align button in the EQMac toolbar. What you get is a window that keeps track of all the sync points you have made. There is a list of all the sync points and a plot of where they correspond to on the visible sky. Before we get started though, let's talk a little bit about how EQMac manages the sync data.
Firstly, when you perform a Sync operation, EQMac captures the data in terms of RA/DEC encoder positions rather than actual RA/DEC coordinates. This is because celestial coordinates change over the course of a night, whereas a given encoder position is fixed. Every time the mount moves to that same encoder position, we want the mount to apply the same correction regardless of what it happens to be pointing at. In other words, pointing corrections are based on encoder position. Therefore, given the mount generally only points at the visible sky (and not below the horizon) we can plot all of the sync points on a chart representing the sky visible from your current latitude.
EQMac will save and restore sync data between sessions provided that you Park and Unpark the mount. If you Park the mount before shutting down, and then Unpark when starting up again, EQMac will ask you whether it should restore the sync data from the previous session. If you didn't Park, EQMac doesn't know how the mount is positioned at startup and has to assume it is in the Home position. Under these circumstances it assumes that previous sync data will no longer be valid because the mount will have to be repositioned with the clutches. In a future release, I will relax these rules and allow the sync data to be saved and restored as you require.
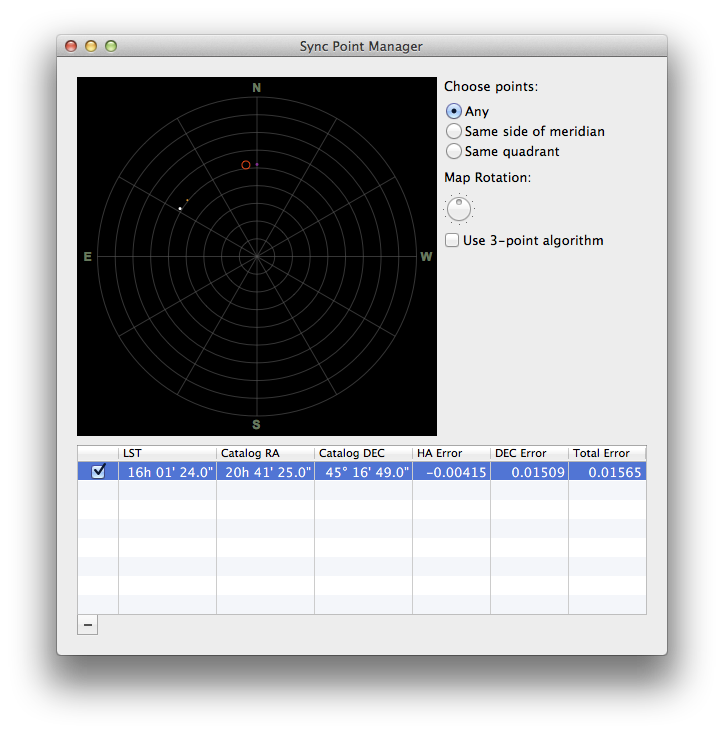
When you have some sync data, the Alignment window will list each point in the table at the bottom of the window. Each point has a check box that you can use to turn an individual sync point on or off. Turning a point off will prevent EQMac from using that point when making pointing corrections. You will also see it disappear from the map and instead be plotted as a simple grey dot. Points that are turned on will be plotted in white with a smaller orange dot. The white represents the "catalogue" position and the orange represents the "actual" position after you have adjusted the slew. This is shown in the screenshot above. If you want to delete a particular point, simply select it and click the "minus" button at the bottom left of the list.
How EQMac Uses Sync Data
EQMac uses the sync data for two purposes. Firstly, when slewing to a target, EQMac will compute a slew correction based on the sync data so that your slew will be more accurate. Secondly, when EQMac wants to report the current position of the mount (for example, to display the current RA and DEC, or to give this information to another interfaced application), it will read the current position of the mount and then apply a correction to obtain the real position. The manner in which these corrections are applied depends on the settings you make in the star alignment window.
Perhaps the most important setting is whether or not to use the 3-point algorithm to compute the corrections. When this option is unchecked, EQMac will use a 1-point (nearest point) algorithm to compute corrections. This is how EQMac has always operated since the initial releases. If you enable the 3-point algorithm, EQMac will use a more involved computation using 3 sync points to compute a correction. These algorithms are described below.
The 1-Point (nearest point) Algorithm
When 3-point mode is not enabled, or you have less than 3 sync points in total, EQMac will compute corrections using a single point. To do this, EQMac will take your chosen slew target and compute the encoder positions that would be required to slew to that target. It will then find the nearest sync point to that encoder position and apply the correction that was needed when that sync point was added. Thus, if you only have one sync point for the whole sky, the further your slew target is from that point, the less relevant that sync correction will be. The correction will help somewhat, but it is likely the slew will vary in accuracy with the distance from the sync point.
When you initiate a slew, you will see the chosen (nearest) sync point turn green in the sync point map. This indicates that EQMac is using the point for computing slew corrections. You will then see the red circle begin to track the slew across the sky and it will be accompanied by a purple dot. The dot represents where the mount encoders are saying that is it pointing. The red circle represents where the mount is pointing after corrections are applied. Thus, when your mount is in the home position, with one sync point, you may notice that the purple dot is exactly on the pole, whilst the red circle is offset from that somewhat. This reflects the fact that the mount encoders say the mount is in the home position, but in reality, it is pointing slightly away from the pole. This situation is shown in the screenshot above.
The 3-Point (triangles) Algorithm (only for v1.3.1 and above)
When 3-point mode is enabled and you have at least 3 sync points added, EQMac will begin to compute corrections using a 3-point triangle. To do this, EQMac will take your chosen slew target and compute the encoder positions that would be required to slew to that target. It will then search combinations of 3 sync points to find a triangle that surrounds the slew target and has the target as close as possible to the centroid of the triangle. If no such triangle can be found, EQMac will fall back and use the 1-point algorithm instead as described above. However, if a triangle is found, EQMac will compute a coordinate transformation matrix using the 3 sync data points in the triangle and use this matrix to apply a correction to your slew target.
When you initiate a slew, you will notice that 3 sync points turn green and a triangle is plotted. This indicates that EQMac is using those sync points to compute the coordinate transformation matrix for the current slew. Again the red circle and purple dot will begin tracking the slew, as for the 1-point algorithm. You should find that if you add 3 sync points that create a triangle covering a large expanse of sky, that slews within the triangle should be relatively accurate. For slews to targets lying outside the triangle, the 1-point algorithm will be used instead at present.
Affecting the Choice of Sync Points
You will notice a set of 3 radio buttons in the top right of the Star Alignment window. These allow you to control which sync points EQMac will consider using to compute corrections for a given slew. Choosing "Any" will let EQMac use any of the points you currently have enabled. On the other hand, if you choose "Same Side of Meridian", EQMac will only consider sync points on the same side of the meridian as your chosen slew target. Finally, choosing "Same Quadrant" will further restrict the choice of points to the quarter of the sky that contains your slew target. The theory here is that sync points in the opposite meridian or in other quadrants might be the closest points for some slews. However, the corrections they would give rise to may not be particularly accurate due to being too far away. I would regard this feature as largely experimental. Whether or not you feel it makes a difference would be a matter of experimentation with different settings.
Status of the 3-Point Algorithm
At the time of writing, I have not been able to extensively test the 3-point algorithms. Therefore, when you enable this feature, you are essentially running the software in a largely untested state. It may be that the corrections it computes in 3-point mode are not very accurate and there may be bugs that I have yet to find and correct. I am hoping to do some proper testing of this feature over the summer months and make sure it is working well. In the meantime, if you do try this mode, please give me any feedback you have on how well it is working (or not). Any feedback you have will certainly help improve things for everyone.
If you do discover problems, just turn the 3-point mode off and EQMac will only use the 1-point algorithm and will operate as it has always done in the past.
- Log in to post comments